

Introduction
I’ve recently migrated my blog from Blogspot to Github Pages. The main reasons to do are:
- I wanted to use markdown as language to edit my posts. Markdown is becoming the standard to write documentation, so I would like to have my posts in a format that I can easily migrate or post in other platforms.
- Blogspot is a great tool for editing text, but it is not so good for adding source code. In spite of the fact that you can edit your template and add scripts, the highlighters I’ve tried were not very good. However, writing source code in markdown works pretty well and it supports many languages.
Then, in order to migrate the content of my blog, I tried multiple ways and I wanted to document the steps that worked better for me, in case it can help other people.
Steps to migrate your blog
Create your blog at Github pages
First of all, you will need a blog in Github pages. In order to create your blog template, you can use Jekyll, which is an open source project to convert your plain text into static websites or blogs.
For the theme of your blog, you will have many options, free or paid. In this website you can find many examples: https://jekyllthemes.io/
For this post, I’ve chosen Beautiful Jekyll, because it simple and it has a free plan, which can be enough for your needs.
In order to setup your blog with beautiful Jekyll, you just have to fork this repository [In order to setup your blog with beautiful Jekyll, you just have to fork this repository https://github.com/daattali/beautiful-jekyll, rename the project to be like [https://

Then, you just need to add your posts as markdown files in the folder _posts, and they will be automatically published in your blog. You will be able to see your blog at [https://
Apart from that, you can also run your blog based on Jekyll locally. In order to do so, you will have to install Ruby, RubyGems, GCC and make. You will find more instructions for your operating system here: https://jekyllrb.com/docs/installation/.
Once you followed the installation guide, you will be able to run the following command and your blog will be available at http://localhost:4000.
1
bundle exec jekyll serve
Migrate your posts
1) Import your posts from Blogspot
Once, you have your Github blog setup, you will need to import your posts from blogspot. For this step, I’ve tried different methods and this is the one that worked better for me.
To import your content at Blogspot, you will need ruby installed. Then, you have to run the script that I shared in this Github gist.
In order to run the script you can copy it to the root folder of your blog repository, and then run the command:
1
./blogger_to_jekyll.rb http://{your_blog_name}.blogspot.com/feeds/posts/default
2) Rename html files to markdown
When you run the script of step 1, I will create one html file per post in the folder _posts, so need to rename them to markdown files. In order to so, you can just use this simple powershell script:
1
Dir *.html | rename-item -newname { [io.path]::ChangeExtension($_.name, "md") }
3) Convert content from html to markdown
This step is optional, but in my case the html produced by blogspot was complex and I notice some rendering errors in Jekyll. For that reason, I decided to convert them into markdown.
For this step I used this online converter: https://codebeautify.org/html-to-markdown
Use your custom domain
If you were using a custom domain for your old blog, you will have to redirect it to your new blog on Github pages.
For this, you will have to go to your domain provider and configure it to point to your Github blog.
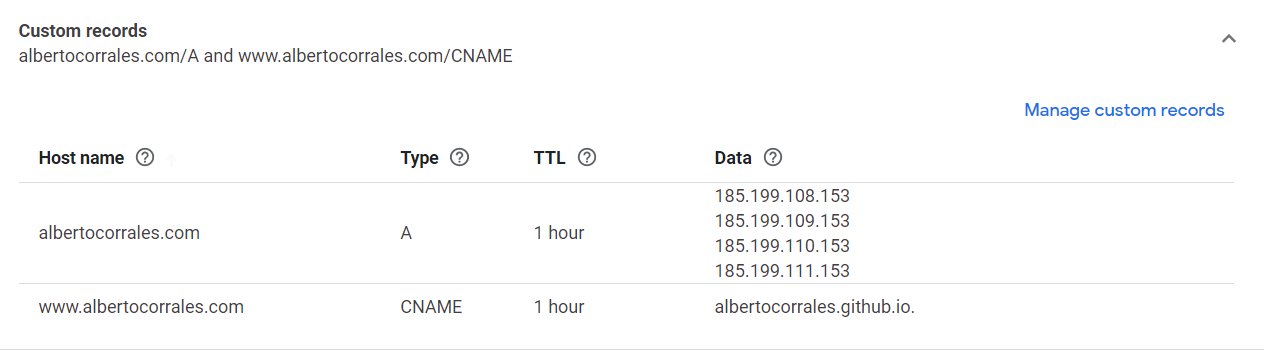
First, you need to an A record to the IP addresses for GitHub Pages. At this moment these IPs are:
1
2
3
4
185.199.108.153
185.199.109.153
185.199.110.153
185.199.111.153
But you can check this link in case they change in the future.
Then, you need to add a CNAME record pointing to your Github URL. In my case, I’m using Google Domains and my configuration looks like this:
Finally, you have to configure your custom domain in Github. For this, go to your blog repository. Them, go to Settings -> Pages.
In section custom domain, add your custom domain URL. This will check your configuration and it will start redirecting the traffic from your custom domain, but it might take a few minutes.
Don’t forget about checking the Enforce HTTPS option.
Conclusions
In this post we have seen how to create a new blog in Github pages and migrate your content from an existing blog in Blogspot.
Finally, we have seen how you can configure your custom domain to point to your new blog.
This post is based on the process I’ve used to migrate my own blog after doing some researching, so I hope this can be helpful for you if you are looking for something similar.
In my personal experience, it feels really good editing my articles in MarkDown language and having Git to backup my content. In addition, it has been great to play around with Ruby an explore Jekyll, which brigs us a lot of possibilities when it comes to customization of our blogs.