
Introduction
In order to implement Continuous Integration and Continuous Delivery (CI/CD), we normally build pipelines. These pipelines are automatically triggered when we build new functionality, we push it into our source code repository, and it is merged into the master branch. As part of this process, we should have some automated or manual quality checks, such us code review, vulnerabilities scan, automatic testing, etc.
Once the pipeline is triggered, it will guide the delivery process and how the changes are being promoted across multiple environments.
Regarding Azure DevOps pipelines, it is a technology that has been evolving during the last few years as CI/CD has become more relevant. In the past, we used to have a build definition and a release definition, which were manually configured by dragging and dropping tasks. You can find more information about Azure DevOps pipelines in this link.
More recently, Azure Pipelines introduced the YAML pipelines. This new way to define our pipelines was a very relevant improvement, because it allowed us to consistently reuse our pipeline definitions and define them dynamically. This is especially useful for complex pipelines, where we have multiple services or environments as part of our continuous delivery process.
In order to build YAML pipelines, we need to use an specific syntax, which allows us to define our pipeline. This language includes concepts such as stages, jobs, tasks, variables, etc. In addition, we can use some expressions in order to dynamically build conditions, loops, built-in functions, etc.
Limitations and disadvantages of Azure DevOps YAML pipelines
Azure DevOps YAML pipelines is an useful way to dynamically define our pipelines. However, in an enterprise context, where we might have very complex pipelines, YAML pipelines might have some limitations/disadvantages:
1) YAML pipelines are tightly coupled to Azure DevOps
When we work with Azure DevOps YAML pipelines, we need to use their language. For that reason, if we want to run our pipeline in a different provider (like GitHub Actions), we won’t be able to do it.
2) Working with YAML is tedious and error prone
YAML is a human-readable data-serialization, which is commonly used for configuration files and in applications where the data is stored or transmitted. YAML has became very trendy, but it comes with some challenges, especially for complex YAML files or when we introduce programming features, such as the expressions in Azure DevOps. When we are configuring YAML, we might need to deal with issues such as indentation errors, typos or having huge files that are a mix of expressions, scripts, etc. As a result, maintaining those YAML files might be a real challenge. We can find this situation not only in Azure DevOps, but in other technologies like Terraform or Docker.

3) We cannot test our pipelines locally
One of the biggest limitations of Azure DevOps pipelines, is the fact that we cannot test or run our pipelines locally. In order words, when we are updating or creating a new pipeline, we need to edit our YAML file, push the pipeline definition to our repository, and run the pipeline in order to test it.
During this process, we will often find out that there were some issues with our pipeline definition, so we need to repeat this process over and over. As a consequence, working with YAML pipelines might slow us down.
4) YAML size limit of 2MBs
When we are building YAML pipelines, we normally use templates, so we can reuse the same set of tasks, jobs or stages across our pipeline. Using templates is really helpful to make our templates simpler and more maintainable. However, when Azure DevOps triggers a build, it will generate an extended YAML file for the pipeline.
As an example, if we have a template to deploy a lambda function with length 30 lines of YAML and we use that template to deploy 10 lambdas in our pipeline, it will generate an extended YAML file with 300 lines. This situation can get worse and worse when we are working with complex pipelines, where our CI/CD process includes many services or many environments. Working with the extended YAML file can be a serious limitation for complex pipelines, as Azure DevOps imposes a size limit of 2MB for the extended YAML file.
In order to try to mitigate this limitation, we can try to work with the strategy matrix. When we use the strategy matrix, the extended YAML won’t duplicate the YAML. However, it only works at job level and it might be not very effective if our pipeline is using different templates for building/deploying different type of projects.
Using Nuke Build
When it comes to tools for replacing YAML in Azure DevOps pipelines, there are multiple projects which follow different approaches, but with the same goal. Some examples are:
Most of these tools use C# as programming language, as it is the most popular language for developers who work with Microsoft technologies. This is a great advantage, as C# is a rich strongly typed language and there are libraries to do anything you can need your pipelines.
Apart from that, these tools provide an SDK that will make easier building pipelines.
From the tools mentioned above, Nuke Build is the most popular and advanced one. Some of the features that make Nuke Build a great choice are:
- It is very easy to install and start working with it.
- It is agnostic, so you can run it on any providers.
- It provides a rich developing experience and the SDK includes common tasks you might need in your pipeline.
- You can run and debug your pipelines locally.
- It provides a CLI which is really helpful to set new projects, run a plan, etc.
- It provides support for the most popular CI/CD vendors.
How to setup a new Nuke project
Setting up a new Nuke project is quite straightforward. First of all, you have to install the global tool with the following command:
1
dotnet tool install Nuke.GlobalTool --global
Then, you can setup your nuke project with the command:
1
nuke :setup
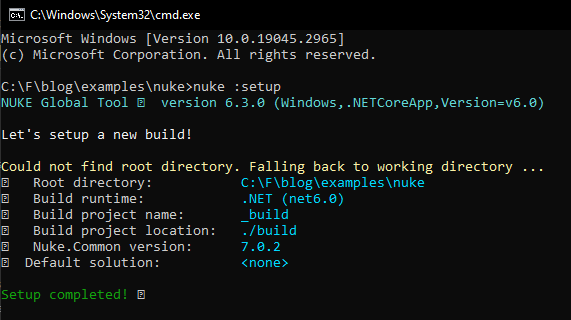
This is how it looks the example build created by Nuke
1
2
3
4
5
6
7
8
9
10
11
12
13
14
15
16
17
18
19
20
21
22
23
24
25
26
27
28
29
30
using Nuke.Common;
using System;

class Build : NukeBuild
{
    public static int Main () => Execute<Build>(x => x.Compile);

    [Parameter("Configuration to build - Default is 'Debug' (local) or 'Release' (server)")]
    readonly Configuration Configuration = IsLocalBuild ? Configuration.Debug : Configuration.Release;

    Target Clean => _ => _
        .Before(Restore)
        .Executes(() =>
        {
            Console.WriteLine("Clean");
        });

    Target Restore => _ => _
        .Executes(() =>
        {
            Console.WriteLine("Restore");
        });

    Target Compile => _ => _
        .DependsOn(Restore)
        .Executes(() =>
        {
            Console.WriteLine("Compile");
        });
}
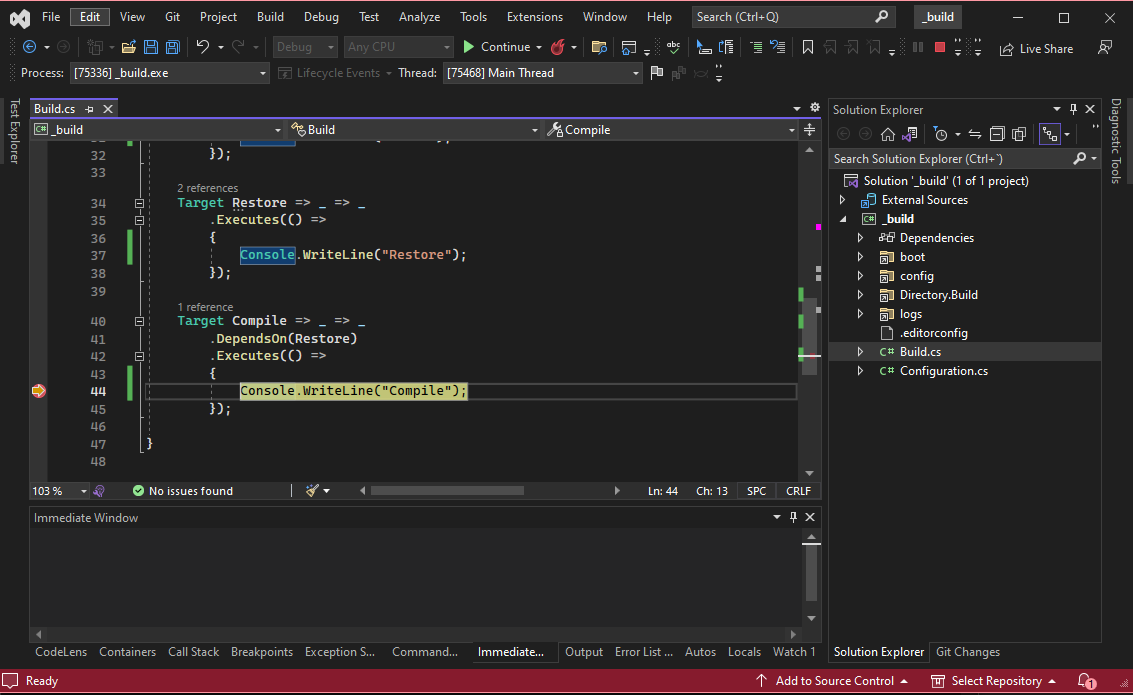
Now we can run the build just with the command nuke or from VisualStudio, we can open the project and run it as any other dotnet program. Apart from that, we can easily set breaking points and debug our nuke builds in a very convenient way.
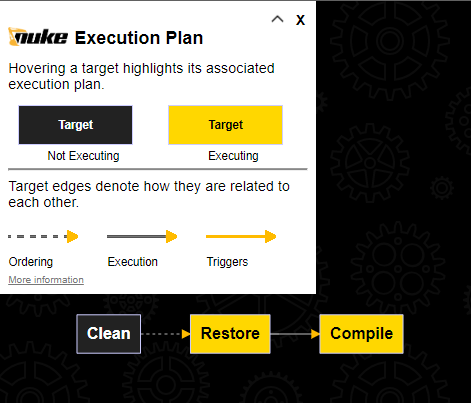
Apart from this, we can check the plan of our build. This can be very useful for complex builds. In order to do so, we can run the command:
1
nuke --plan
And we will display the flow diagram of our build:
Integration between Nuke and Azure DevOps
If you are working with a very simple pipeline, Nuke might be all you need to build it. However, for more complex pipelines, you might need a pipeline with multiple jobs or stages running in parallel. For these scenarios, you can still work with Nuke to build the tasks of a job, but combine it with the concepts provided by Azure DevOps such as stages, jobs, etc. This will allow you to run different jobs/stages in parallel (this is a limitation for nuke at the moment). In addition, you can leverage the permissions model for Azure DevOps, which can be handy if you need approvals for promoting your changes to production environments.
By following this approach, we would have a small part of YAML that defines the structure of your pipeline with the stages/jobs, but most of the pipeline logic would be done by Nuke projects.
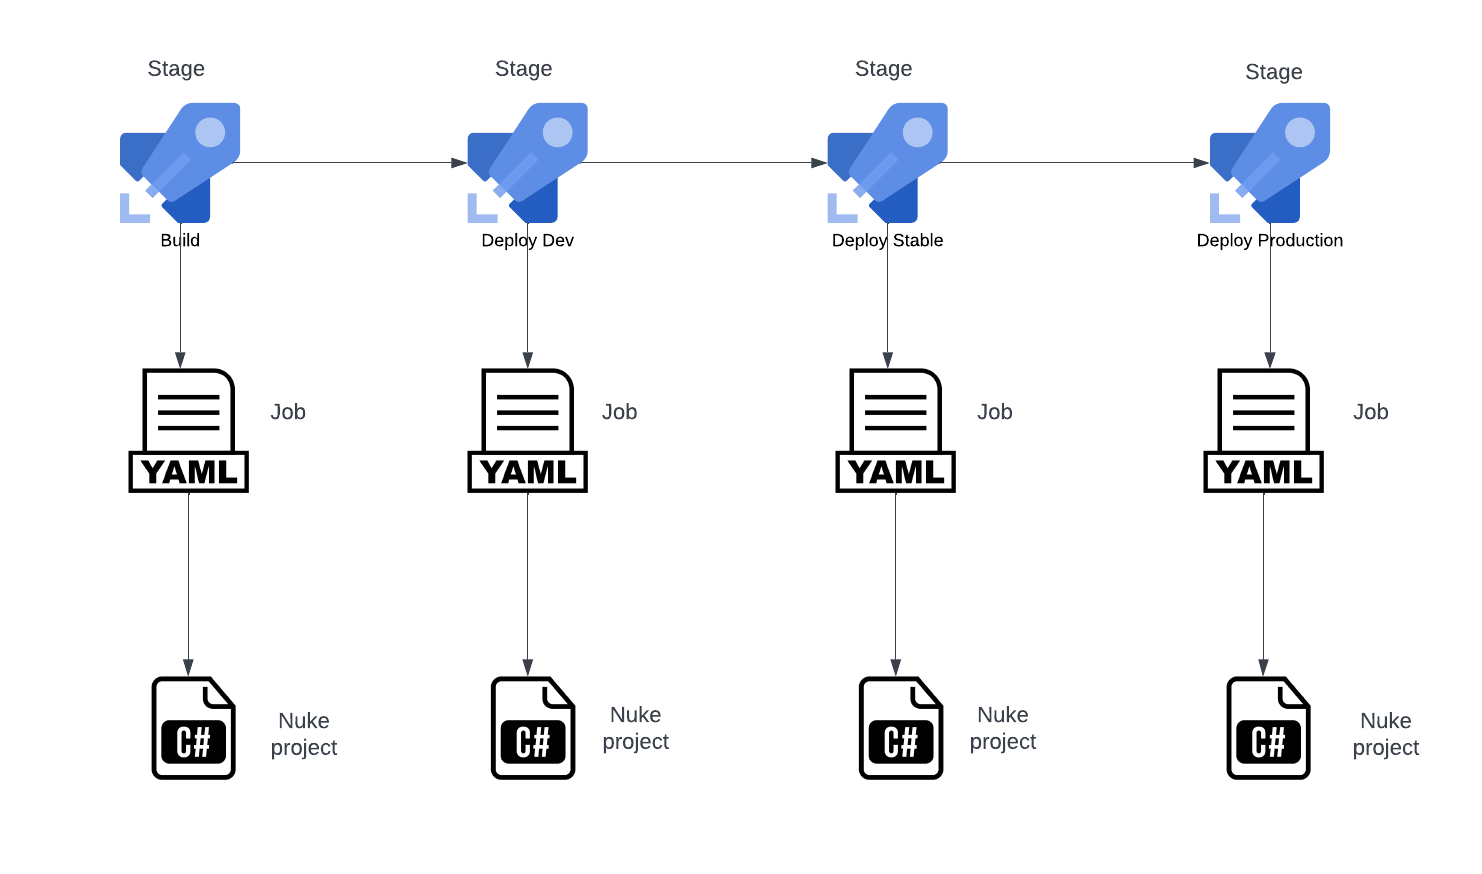
In this case, for each job, our YAML template would look similar to this:
1
2
3
4
5
6
7
8
9
10
11
12
13
14
15
parameters:
  - name: Paramter1
    type: string
  - name: Parameter2
    type: string

jobs:
  - job: myJob
    steps:
      - bash: ./build.sh
        displayName: CI
        workingDirectory: "$(Build.SourcesDirectory)/Build/MyProjectExample"
        env:
          Paramter1: ${ { parameters.Paramter1 } }
          Parameter2: ${ { parameters.Parameter2 } }
On the other hand, if we want to get rid of the whole YAML, we could use Sharpliner to implement the definition of stages and jobs and combine it with Nuke. Sharpliner generates Azure DevOps pipelines in YAML from C#. For that reason, it can be helpful to reduce the errors writing YAML, but we could still hit the size limit for YAML if we overuse it.
Nuke build best practices
In this section we will review some good practices and recommendations based on my experience working with Nuke:
1) Reuse targets:
In order to prevent code duplication, we should always build our targets as generic targets and reuse them whenever it is possible. You can always use parameters to customize certain options in your target.
2) Use dependencies properly:
The dependencies model in Nuke can be a little complex, especially when you have multiple combinations of dependencies between your targets. As a general rule, using TryAfter and TryBefore should be the way to define our dependencies, so we don’t trigger Targets that we are not scheduled in the pipeline project.
DependentFor and DependOn should be used only if there is a strict dependency and that dependency will never change or be optional. You have more info about Nuke dependencies in this link.
3) Idempotent builds:
Our pipelines should be idempotent, so no matter how many times we run them, they should produce the same outcome. In order to achieve this, we can easily clean up temporary files that we create during the build process with the method EnsureCleanDirectory provided by Nuke.
4) Single-responsibility in targets:
When we are building targets, these targets should follow the Single-responsibility principle, so we don’t have targets that are doing more than one thing. On the other hand, we should also prevent building targets that are too small and they don’t provide any value by themselves.
Conclusions
As we have seen in this article, working with YAML to build our CI/CD pipelines can bring some challenges and limitations. In order to deal with these issues, Nuke allows us to build our pipelines as code, so our pipelines will be less error prone, more maintainable and easier to develop/debug.
Using Nuke has a learning curve, but compared to other frameworks it is the most advanced one at the moment and it brings a very good developing experience, especially if you are already using C# in your projects.
However, depending on the complexity of your build, you might need to find a balance and use a mix of Nuke and the CI/CD engine definition. By following this approach, you would have Nuke to cover most of the logic in our pipelines, but you could also leverage features such us jobs/stages parallelization, permissions management, etc.